How to Make the Perfect Chocolate Fondant (Lava Cake)
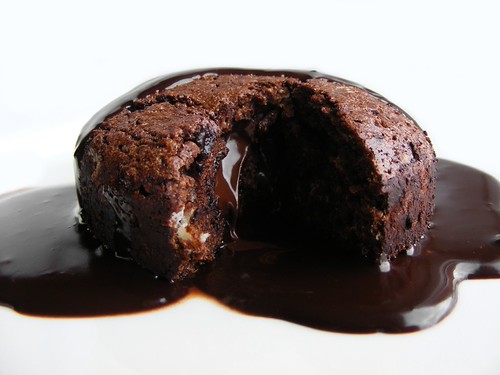
Chocolate Fondant, originally uploaded by FotoosVanRobin.

If you are a great lover of thick, rich, creamy dark chocolate, (and want a quick and satisfying fix for your cravings) then this recipe is just for you!

Chocolate fondant, (also known as lava cake, or molten chocolate cake) is an unbelievably decadent and delicious concoction, and a personal favorite of mine. The pleasantly bitter creaminess of dark chocolate and the soft richness of butter are perfectly melded together in a gooey molten chocolate filling, held inside a cakey exterior, and garnished with a splash of cream (or scoop of ice cream) as the finishing touch to this chocolate masterpiece.

Although this lovely and delicious dessert originated in France, I experienced my first chocolate fondant (which was quite a memorable occasion) while traveling in Indonesia, in a charming restaurant in the small town of Lovina, in Bali. Once I tried my first fondant, and delighted over the flowing layers of chocolate wondrousness, I was changed forever. Ever since that eye-opening experience, I have tried desperately to recreate the perfection of this first taste.

Using the knowledge gained from previous fondant making experiences (after which the recipe was lost!) as well as the guidelines of this video, I was able to finally reproduce the chocolate fondant once again. The recipe listed below is almost identical to the recipe used in the video, only with a couple of slight adjustments, and with added U.S. measurement conversions.

(The addition of mint used in the video was unnecessary in my opinion, but may turn out very nicely if tried, and will perhaps be something that I will try later!)

This video is also very helpful to watch if you are unfamiliar with certain baking methods such as sifting flour, and whisking. I have provided another link here (also listed below) as well, with help in melting the chocolate.

You will need:

  • 1/2 cup (1 stick/100g/3.5oz) butter
  • 1/2 cup (100g/3.5oz) dark chocolate (I actually used semi-sweet chocolate chips, and it worked extremely well- though I suggest using dark chocolate with 70% cacao for a richer flavor)
  • 1/2 cup (50g/2oz) plain flour
  • 3 eggs
  • 1/2 cup (100g/3.5 oz) sugar
  • a sprinkling of cocoa powder (about 1/3 cup or 1 oz or 30g)
  • 2 tablespoons (1 oz) of heavy cream, to pour on top when finished (or a scoop of ice cream)
  • 5 ramekins (or small oven-proof containers)

(This recipe only takes about 15 minutes, from start to finish!)

First: preheat the oven to 356 degrees, (180 celsius)

Then begin!

  1. Coat the ramekins with a lining of butter.
  2. Line the insides of the ramekins with cocoa powder, turning each slowly to fully cover the interior in order to prevent the fondant from sticking.
  3. Melt the chocolate and butter portions using either a bain-marie (3-4 mins) on the stove, or in the microwave <–click here for video example (in the microwave, cook for approximately 2 mins- stop and stir every thirty seconds until melted).
  4. In a separate bowl, whisk the eggs in a circular motion, beaten until they leave a trail when drizzled across themselves. More whisking will make a lighter fondant and less will make the fondant more dense.
  5. Slowly incorporate the sugar into the eggs, while continuing to whisk lightly.
  6. Sift in flour with a sieve and mix (with the eggs and sugar).
  7. Combine the egg, sugar and flour mixture with the chocolate and butter mixture.
  8. Pour into the ramekins, filling each all the way to one inch (about 3 cm) from the top of the container.
  9. Cook for 6 minutes….then check the fondants (do not cook for longer than 10 minutes).

Once finished, the fondants should be slightly firm on the outside, but soft and gooey on the inside. As soon as a doughy, cakey surface has formed on the top of the fondants, they are ready to be taken out!

If you love the combination of cream and chocolate, pour a bit of cream over the top of the fondant as a garnish, or garnish with a scoop of ice cream!

Enjoy!

Please comment, and share your chocolate fondant experiences…I would love to hear about how this recipe worked for you!

How To Make a Giant Vietnamese Sandwich (Bánh mì)

If you have ever tried a Vietnamese sandwich…and I mean a really good one, then perhaps you have dreamed as I have, of a truly giant, utterly wonderful beast of a bánh mì. Here, I will show you how to make this dream come true.

a normal-sized Vietnamese sandwich

Over the past couple of years, I have come to discover that the “Little Saigon” area in San Francisco is home to some of the world’s best bánh mì shops, which by far hold the tastiest sandwiches in the San Francisco Tenderloin (and maybe even the tastiest sandwiches anywhere!) for a overwhelmingly modest price of $3.00.

And so…with the inspiration I have found experiencing the delightfully explosive flavors of the sandwiches from San Francisco, as well as trying less extravagant, original bánh mì from Vietnam, I have devised a recipe for the perfect Vietnamese sandwich for the person with a giant appetite. It is not necessarily the “most authentic,” but having pooled together the knowledge gained from my experiences in eating different variations of Vietnamese sandwiches from all over the world, I have come up with the most delicious recipe that will properly satisfy your cravings for this special delight.

And because it is custom-made to fit your overwhelming desire for as much bánh mì as you could possibly fit in your stomach…(or your refrigerator) approach with caution, and behold the power of the giant bánh mì.

Note: The term bánh mì actually refers to the bread used to make these sandwiches in Vietnam- a baguette that is made out of both rice and wheat flour. However, this term is now used loosely to describe the sandwiches made from this type of bread (as well traditional French baguettes, which we will be using) that are sold in small street carts all over Vietnam.

This is what you will need to complete your journey:

  • 1 carrot
  • 1 daikon radish (also known as “Asian radish”)

this is what daikon looks like, in case you weren't sure

  • 1 large baguette
  • 1/2 cup rice vinegar
  • 2 tablespoons sugar
  • one large handful of cilantro (also known as “coriander” or “fresh coriander” if you live in the U.K.)

a beautiful bunch of cilantro

  • roast pork (using leftover pork works well for this..the seasoning of the pork can vary, depending on what you like!) sliced into small pieces as shown below

pre-cooked roast pork like this is perfect to use

  • high quality sliced bologna (please no Oscar Meyer! I absolutely forbid it!)
  • approximately 4 tablespoons of pâté
  • 3 jalapeño peppers…red or green, or both! + another pepper if you want some extra spiciness! These should be sliced as shown below.

red and green jalapeño peppers + one serrano pepper

  • 1/2 cucumber, julienne-sliced

cucumber, sliced into thin strips

  • 1 tablespoon mayonnaise (NO fake mayonnaise. If you feel obligated to use diet mayonnaise, then you probably shouldn’t be eating a GIANT Vietnamese sandwich.)
  • Sriracha hot sauce (as much as you want, but please don’t overdo it!)

Sriracha hot sauce

  • one equally eager and overly ambitious and very hungry friend, lover, or family member (optional. If you are feeling greedy, keep it all to yourself!)

What to do:

Using a vegetable peeler, slice away at the carrot and daikon as they peel into thin strips, until you have about 1 cup of the peelings. Place this mixture into a bowl, and mix thoroughly with the rice vinegar and sugar. If you have time, let this marinate for a few hours, and up to two days. If you are impatient, (and want your giant bánh mì sandwich now!) let it sit for fifteen minutes.

daikon and carrot mixture

Next, slice the baguette down the middle, and (if you are American and love your bread toasty!) toast the baguette (lying open with inside faced up) lightly in the oven, broiled on high for a few minutes at most.

Everything should now be pre-sliced, prepared and ready for assembly.

READY???

1. prepare the giant baguette for assembly

2. spread the mayonnaise evenly on both inside surfaces of the bread

3. spread the Sriracha on inside of the bread

4. spread a generous portion of pâté on one side of the bread

5. place the bologna slices on the inside of the bread

6. sprinkle the sliced peppers inside the bread

7. add a hefty bunch of cilantro!

8. now throw the cucumber in there as well

9. add the daikon and carrot mixture (only the vegetables, not the liquid)

9. and lastly, shove in the pork!

10. now marvel at your beautiful creation

Congratulations! You are finished!

Enjoy.

Design a site like this with WordPress.com
Get started